If you’re ramping up content marketing for your business, then it’s inevitable that you’ll need more video content. Not all videos require the skills of a videographer or video production agency. Marketers often find themselves staring down the lens of a camera as it’s easier, cheaper or effective to shoot content themselves to make a in-house video.
Basic video production could simply mean using a camera phone and an app to edit. But if you’re seriously thinking about creating high quality video content, here’s our walk-through on getting started.
This blog covers all the pieces of equipment and software you will need to be able to create great looking video content.
– Camera kit
– Audio
– Lighting
– Software
– Webinar hosting tools
– Accessories
Can I use my phone?
The short answer is yes. Most phone cameras can shoot in HD and some can even go as high as 4K, they also have slow motion options and are often very stable when handheld. There are also a number of accessories like tripods and gimbals being made specifically for phones and it can even be possible to get a lens adapter so you can attach different lenses for a much more professional finish.
Obviously, your phone model will make a difference to what sort of video capability you have but any of the recent iPhones or Samsung phones will definitely be able to shoot HD video and most likely slow motion as well, which is all you really need.
One of the drawbacks to shooting on a phone is that your storage space is fixed. You won’t be able to change SD cards when it gets full so the amount you can film before having to back up the footage is very limited. Some models of phone do come with a SD/MicroSD card slot, but this isn’t as common anymore. I would advise against going with an older model and sacrificing camera quality for the sake of an SD card slot.
Cost: FREE (if you already have a suitable phone model)
Can I use my webcam?
When we think of location filming it is outside of the office, so a webcam isn’t going to be a viable choice here. However, it is a great option for webinar and screen capture recording.
Why do I need an expensive DSLR/Mirrorless camera?
Although the sensors in phone cameras are certainly putting up a fight against low-mid range DSLR/Mirrorless cameras nowadays, that’s about the only category they can compete in (besides image stabilisation).
Spending a little more and getting a DSLR/Mirrorless camera will give you a much better filmmaking tool than your phone. These cameras have added benefits of good dynamic range (the range of the lightest and darkest areas of an image the camera can capture without losing detail), the ability to change lenses, a wide range of lenses to choose from and proper video codecs (which give better detail in post-production).
There are lots of high spec cameras you could choose from, all with very different prices and offering various technical specifications. Having done a little research, this is what we would recommend as a good starter camera for around £1000.
Sony a6400:
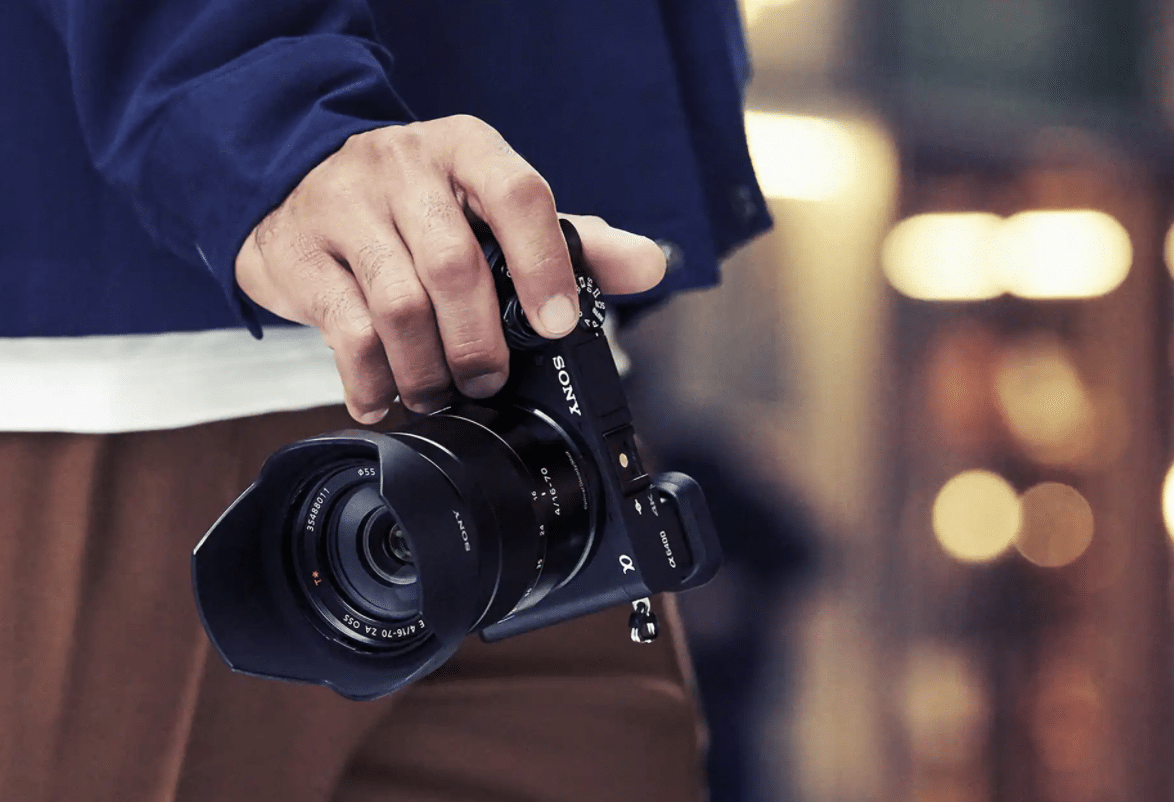
The Sony a6400 is a great entry level camera which has several more advanced features such as the ability to shoot in Sony’s Log profiles. It also provides several different recording formats – great for a more experienced videographer who would like a little more freedom in post-production.
It has an APS-C sensor giving a crop factor of 1.5x. This means that when you put a lens on the camera it will give a slightly more telephoto image. For example, using a 50mm lens on the Sony a6400 would give the same field of view as a 75mm. It doesn’t affect image quality, but it is something to be aware of when thinking about the focal length of your lenses.
The Sony a6400 can shoot at up to 120fps in 1080p, this means you can capture some impressive slow motion in HD quality which is rare at this price point. The camera can also record in 4K which gives this camera some longevity as the world moves away from 1080p HD and towards 4K.
It also has no record limit time, which is fantastic if you are looking to film interviews or events and is the main reason it is our recommendation. Most DSLR/mirrorless cameras at this price point have a record limit time. For example the Fujifilm X-T30 is a fantastic camera but has a built-in record limit time of 15 minutes in HD and 10 minutes in 4K. We think being able to hit record without having to worry about your camera automatically cutting after 15 minutes is a must.
With a very reasonable battery life of around 80 – 90 minutes, it has auto focus and comes with a titling touchscreen display. This is great if you are ever recording yourself and want to be able to check your shot while in front of the camera.
There are a few drawbacks to this camera. If you are using a hot shoe microphone such as the Rode video mic pro, it will block the tilting screen when flipped up. The absence of a headphone jack is frustrating especially when using it for interviews. You can work around this though (see our audio section for more).
This camera does not come with IBIS (in-body image stabilisation) which means if you are shooting handheld on anything more than 35mm (24mm as it’s an APC sensor) you will see shake no matter how steady your hands are.
Cost: £999 with 16-50mm Zoom kit lens
You will also need to get an SD card for the camera.
You could get a 64gb or even 32gb SD card if you want to save a little more money, but SD cards are not that expensive and if you want to film in 4K or at 120fps in HD, you will want the extra card space.
Also, make sure that if you do go with a different SD card that it has a write speed of over 100 MB/s as this can limit the quality of your recordings if it is too slow. The card we have suggested has a write speed of 170 MB/s which is more than enough for this camera.
Cost: £35
Other camera options: Fujifilm X-T30, Canon M50
Download a FREE production process template
Organise and plan your team in a filming and animation schedule
Audio
In order to get good quality sound, you will need an external microphone. Most cameras have an in-built microphone, but they are often poor quality and only used as a reference for syncing in post-production.
Instead of the camera’s built-in microphone, you can use a hot shoe microphone. These mount onto the top of your camera and are often directional microphones, which means they are most sensitive at the front and pick-up minimal sounds from behind.
Rode Video Mic Pro:
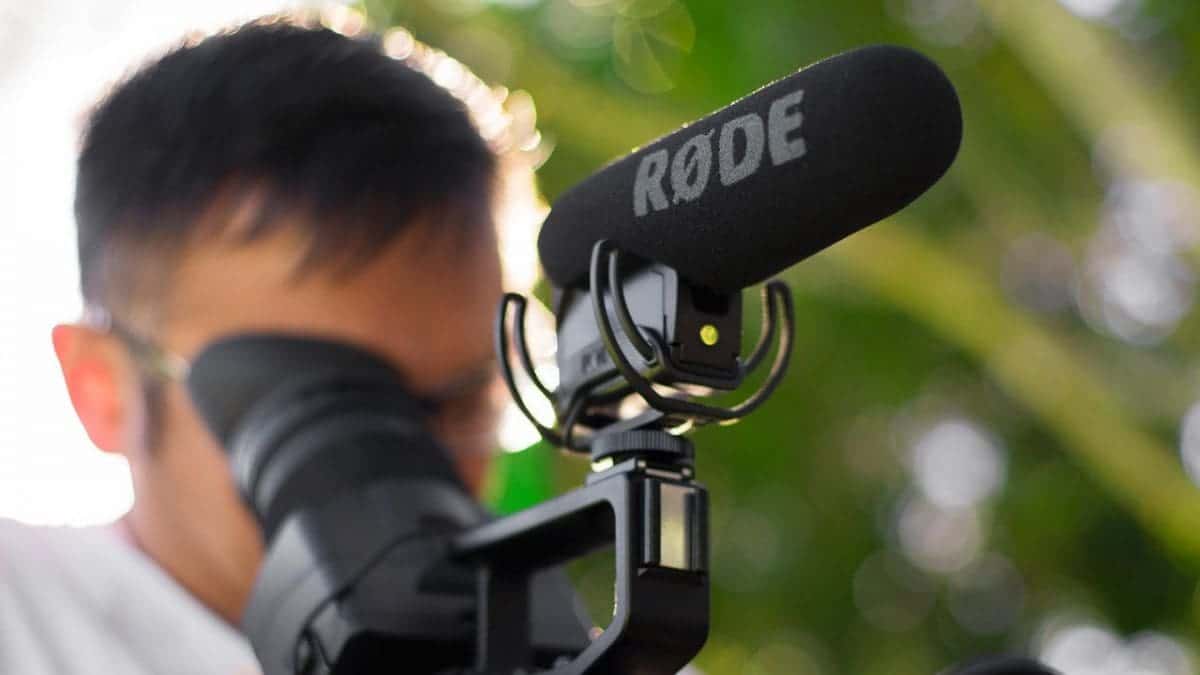
This microphone is very good quality and comes with a shock mount which will help reduce the sound of any movement or knocks. It plugs into your camera through a 3.5mm jack and you can adjust the sensitivity on the microphone to get cleaner sound.
It is great for getting high quality in-camera sound that you could use in your video and can also be used to do interviews if you needed.
Cost: £169
You should also consider getting a lavalier microphone. These are omni directional and are very useful for interviews or piece to cameras (PTCs). They are great at picking up people’s voices and with a little bit of set up (and tape) you can hide these mics on your interview subject, giving you great sound quality and a clean looking interview.
Microphone
AKG C417 PP Professional Lavalier mic
Cost: £99
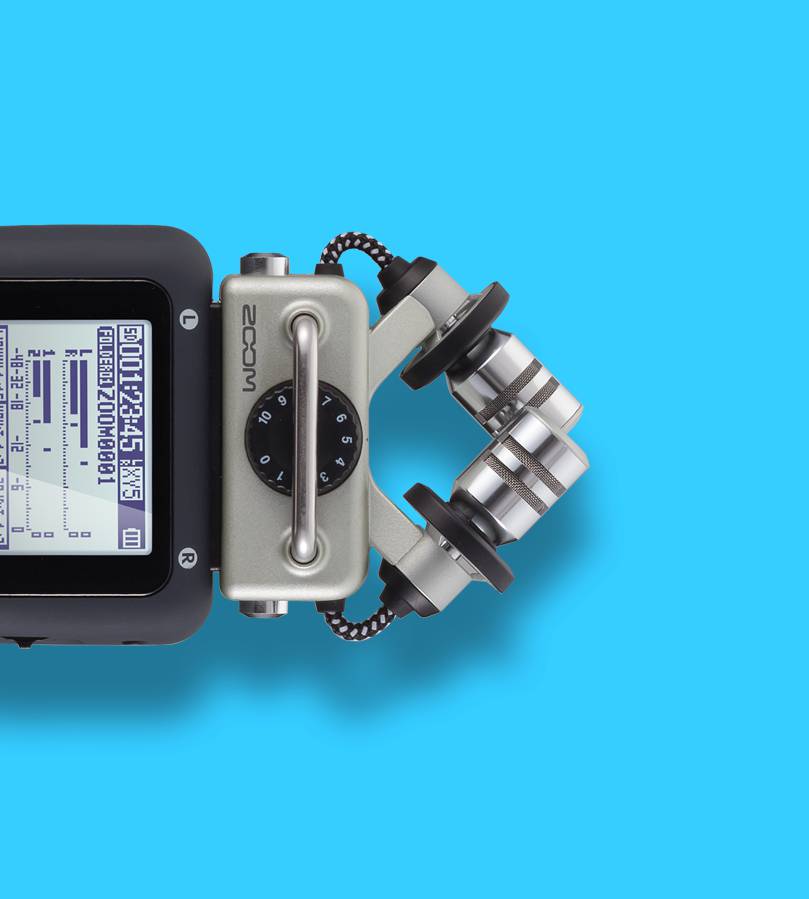
This microphone has an XLR connection, which means it won’t be able to go directly into your Sony a6400 camera. Instead, this microphone needs to be connected to an external recorded such as:
The Zoom H5
This recorder has two XLR inputs and a headphone jack which allows you to monitor the sound coming from the lavalier microphone during interviews and make sure everything sounds good. You can adjust the microphone sensitivity from the Zoom H5. It comes with two stereo microphones on top which can be great for picking up atmospheric sound.
Cost: £215
You’ll also need to get an SD card for the Zoom H5. As audio doesn’t take up nearly as much space as video, any SD card above 16GB will be fine.
Cost £15
Radio mics can also be a great option for recording audio. They are similar to a lavalier microphone except as they are wireless so your subject can be further away from you, walking around a space and you will still be able to hear them. This can be really useful for presenter-led video and they also work great as an interview microphone.
SubZero SZW-C40 Camera Wireless Lavalier Microphone System
This radio mic has a 3.5mm out port which means you could plug it straight into your camera, but keep in mind that you won’t be able to monitor the sound over headphones. I suggest you also get a 3.5mm to XLR male adapter so that you can use these with the Zoom H5 and monitor your audio.
Cost with 3.5mm to XLR male adapter cable: £163
When recording on the external recorder be aware that you will need to sync your video and audio in post-production. A clapper board is helpful. Or you can just use your hands which you would position in front of the camera and clap to create a peak on the audio. You then match the audio spike up to the moment your hands come together in the video in your editing software. This syncs your audio.
Cost: FREE
If you wanted to use your phone for recording, the Rode Video Mic Pro and SubZero Radio Mics that have a 3.5mm jack can be used so long as your phone has a 3.5mm in port. For newer iPhones, you will need to use an adapter as they removed the headphone port after the iPhone 7.
You could also use the external recorder in the same way as you would with your camera and clap to sync up the audio. This is probably the best option however, an external microphone is not necessary when recording on a phone as phone microphones are often fairly good quality, much better than the in-built microphone on the Sony a6400 would be.
Lighting
When it comes to lighting it really depends on what you are filming. If you are in a well-lit environment or outside you may not need any lights. But lighting can certainly come in handy when you are shooting somewhere with no natural light or are wanting to set up a great looking interview.
We recommend picking up this set of Neewer LED lights:
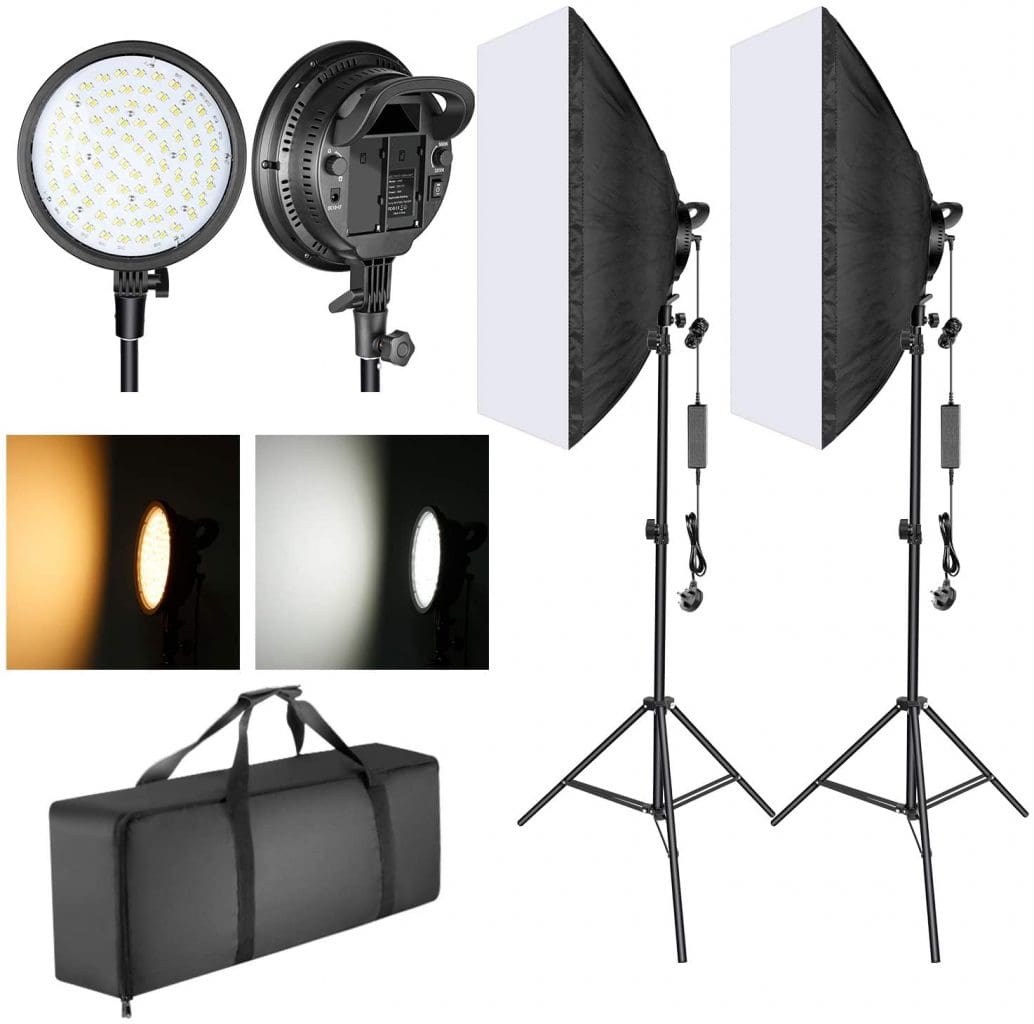
Neewer Photography Bi-Color Dimmable LED Softbox Lighting Kit
They are dimmable, come with soft boxes and stands and have two different colour temperatures, 3200K which is a warmer (more orange) light and 5600K which is daylight (white light). They are a great lighting solution without having to spend a lot of money and they don’t take up too much space.
Cost: £110
Also, I recommend you pick up a 5 in 1 reflector:
Neewer 32-Inch 80CM Portable 5 in 1 Translucent, Silver, Gold, White, and Black Collapsible Round Multi Disc Light Reflector
These are relatively inexpensive and are great for reflecting the natural light in a space or outside to give your shots a little something extra.
Cost: £22.99
Software
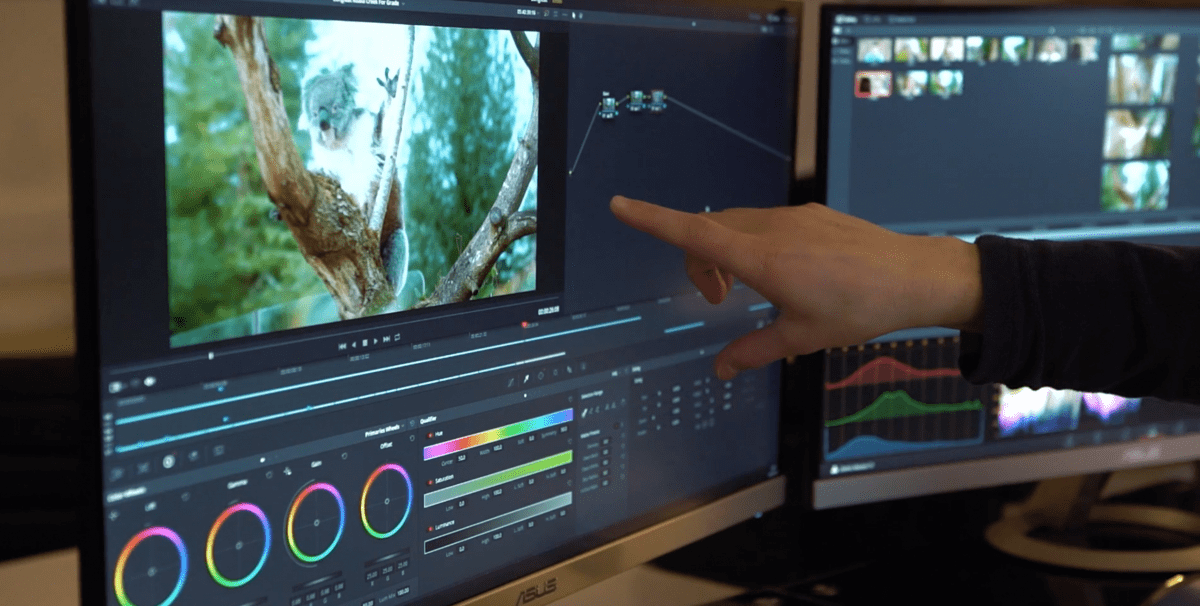
When it comes to making video content there is always some degree of editing that is required. There are many different software products you can use for this so I’m going to take you through some options, and you can decide which one suits your budget/experience.
Low budget, little to no experience: iMovie/Movie Maker
These are the editing software that come pre-installed on all Mac/PC computers. iMovie is slightly slicker than Movie Maker but they both do the same thing. They give you the basic tools needed to cut and edit your video clips together as well as some simple titles and transitions.
iMovie and Movie Maker are basic tools and very limited, so I would only really recommend these if you are very new to editing. Once you have made a video or two, I would try to move on to one of our other suggestions.
Cost: FREE
Low budget, some experience – Filmora
Filmora is a more intermediate editing software. It is a good stepping stone for moving up to more professional video editors as it simplifies a lot of the advanced features you will see in software like Premiere Pro or DaVinci.
You might want a little bit of experience with editing before using Filmora, but there are many tutorials online and I think this is probably the best software to start with.
Cost: FREE
Low – medium budget, lots of experience – DaVinci Resolve
DaVinci is a professional video editing software. There is a free version, and it has pretty much everything you could need to edit a good video. It also has solutions for motion graphics, colour grading, audio post-production and visual effects all built in.
The free version does have some limitations. There is no support for HDR (high dynamic range), no timelines with a resolution greater than 4K and slower encoding but these aren’t huge problems unless you are editing for film or television. For video that is going online, the free version offers more than enough features to create professional looking video. If you did want to use the Sony a6400 to its full capacity and shoot some 4K then you can always upgrade to the studio version later.
This software will require a lot of training to use, especially if you are unfamiliar with professional editing software. It will take some time to be able to get the most out of this editor but if you feel you can handle it, it is the best free software for video editing out there.
Cost: FREE
Cost for studio version: £295
High Budget, lots of experience – Premiere Pro
Premiere Pro is the choice for many professional video editors and production companies. It has all the tools you need to edit a professional video including built-in colour grading, motion graphics and audio post-production tools. However, as Premiere Pro is an Adobe application you need to have an Adobe subscription to be able to use it.
Adobe offer a wide range of applications several of which are specifically design for audio post-production, motion graphics and visual effects. As you get access to all their applications with an Adobe subscription, the workflow often jumps from application to application depending on which is best suited for the task. Need to edit your footage together? Head into Premiere Pro. Audio needs some work? Go into Audition. Need to add some visual effects? After Effects. Colour grading is included within in Premiere Pro but is often done in a third-party colour grader like DaVinci.
This workflow across several applications is fantastic when you have a team of professionals. The editor does their offline edit in Premiere, sends it over to the motion graphics artist for the online edit in After Effects and the sound mixer who works in Audition does the audio post-production. As each application is specific to a certain part of post-production, you are given far more tools to work with.
Premiere Pro has stripped down features of each application built in so if you don’t want to have to learn several different software solutions you can still produce professional videos using only Premiere.
As the Adobe package is subscription based and includes access to all their applications it is more cost effective if you are using a number of them. However, for a smaller monthly fee you can buy Premiere by itself which may be the better solution if you don’t plan on using any of the other applications Adobe offer.
Cost Full Adobe Subscription: £50/month
Cost Single Premiere Pro App: £20/month
Animation
There are several different types of animation and each is often a discipline in itself. But if you want to do some simple graphic animations or maybe even a 2D explainer, there are software solutions out there that you can use.
Each of the editing software programs I listed above have some capacity for animating custom motion graphics. They range from titles, text on screen or lower thirds (graphics with people’s names and often job titles used in interviews that sit in the lower third of the screen). However, if you wanted to do some more advanced graphic animations you should look at using a dedicated piece of software like After Effects.
After Effects is an adobe application which we spoke about in our video editing section. It is expensive and will require training to be able to use effectively if you don’t already have experience with it.
Cost Full Adobe Subscription: £50/month
Cost Single After Effects App: £20/month
After Effects can also be an effective tool for creating 2D animated explainers but if you would prefer a cheaper solution you could look at Open Toonz. It is a free option when it comes to animation that offers all the necessary features to be able to animate in 2D. You can even animate by hand if you are good at drawing.
Cost: FREE
Adobe Animate is a 2D animation software ideal for hand-drawn illustrators. Like all of the Adobe products it requires some training depending on your experience.
Cost Full Adobe Subscription: £50/month
Cost Single Flash App: £20/month
Webinars/Screen Capture
If you want to host webinars or something similar and are recording through your computer, you will need some slight variations on the suggested tools above.
Camera:
If you picked up the Sony a6400 camera then you could use that as your webcam with the right software and cables. Otherwise, the simplest way is to by a HD webcam like this:
Logitech StreamCam
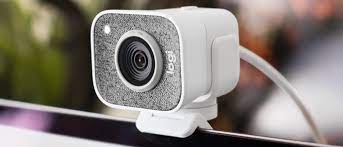
The Logitech Streamcam plugs straight into your computer via USB and gives you a great HD image without much fiddling It has excellent face tracking so you don’t have to worry about going out of focus.
Cost: £140
Audio:
When it comes to audio the Rode Video Mic Pro is not suitable here as it is meant to be used with your camera when filming on location. Your radio microphone may be an option if you have a 3.5mm mic in line on your computer.
We think you are better off getting a more permanent microphone that sits at your desk and gives the same quality every time you sit down to it. For this kind of set up we recommend using a USB microphone. There are plenty of these around, but a few good options are the Blue Snowball, Blue Yeti and Rode NT-USB.
Blue Yeti
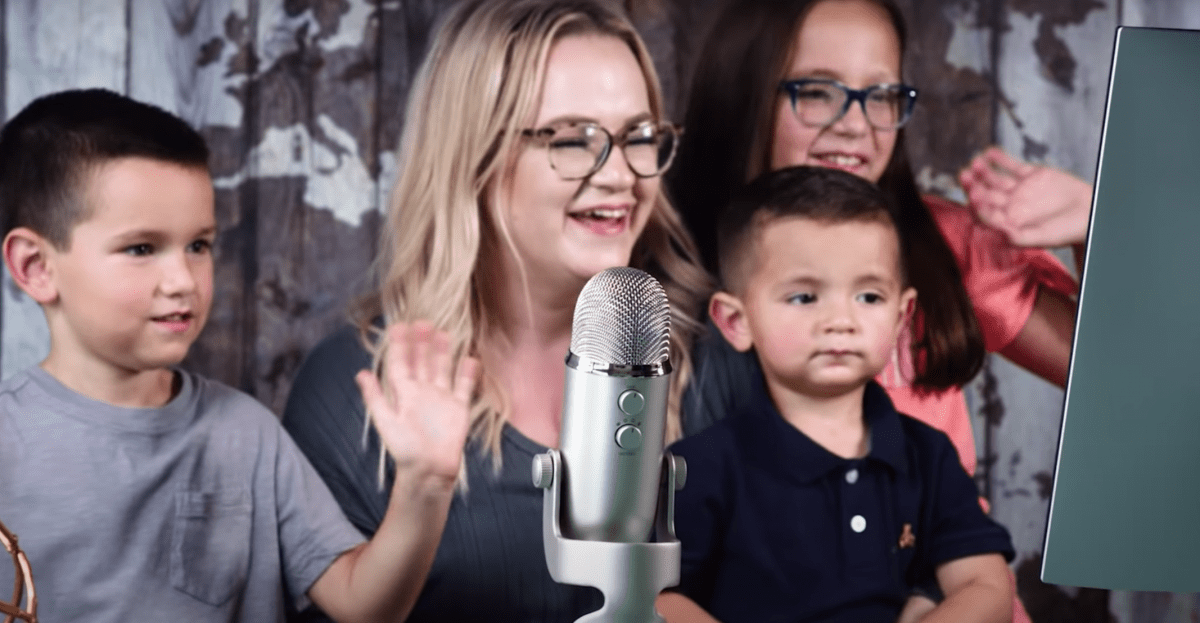
We recommend Blue Yeti. It is better quality that the Blue Snowball and slightly cheaper than the Rode NT-USB.
There are several different settings on this microphone which are great for different situations. For example, you can set it to be directional so it only picks up sound from the front. This would be great for recording a voice over, or you can set it to be omni directional so that it picks up sound from all directions.
Cost: £199.99
Software:
You will also need the right software for the job. This can depend on what you are aiming for with your video. If you are looking to host a webinar for an audience, we’d suggest LiveStorm.
LiveStorm

It has a free version, but it is limited. It allows you to host a webinar for up to 20 minutes and lets up to 10 people register. If you are expecting an audience, I’d advise you go for the premium version which lets you host the webinar for up to 4 hours. Viewers can chat with you and ask questions in real time and you are able to share your screen.
Cost: £90/month
If you are doing training or client meetings that are more 1 on 1, then I would go for a free software like Zoom. You can have up to 100 people in a Zoom meeting for up to 40-minutes which is for most meetings.
Cost: FREE
If you are doing screen recordings, you’ll want some kind of screen capture software. OBS is free and is good quality. There are thousands of tutorials online on how to set it up. You can also record you webcam and microphone at the same time as your screen, which means there would be little to no need for editing except for removing any mistakes.
QuickTime on Mac or Windows Game Capture on PC also have basic functions for screen recording. If you choose to use one of these software, your webcam and microphone will need to be recorded separately. It would probably be best to do that using your camera and lapel mics for best quality, and then assemble everything in your editing software.
We’d suggest OBS as it is free and will save you the time of having to sync everything in postproduction.
Cost: FREE
Accessories:
The camera, microphone and editing software aren’t the only things you need if you are going to make great video content. There are a range of accessories that help with production.
Tripod:
The first and most important is a tripod. This will hold your camera steady and is great for interviews or self-shooting. The best one to go with the camera we have suggested is this:
Libec 650EX
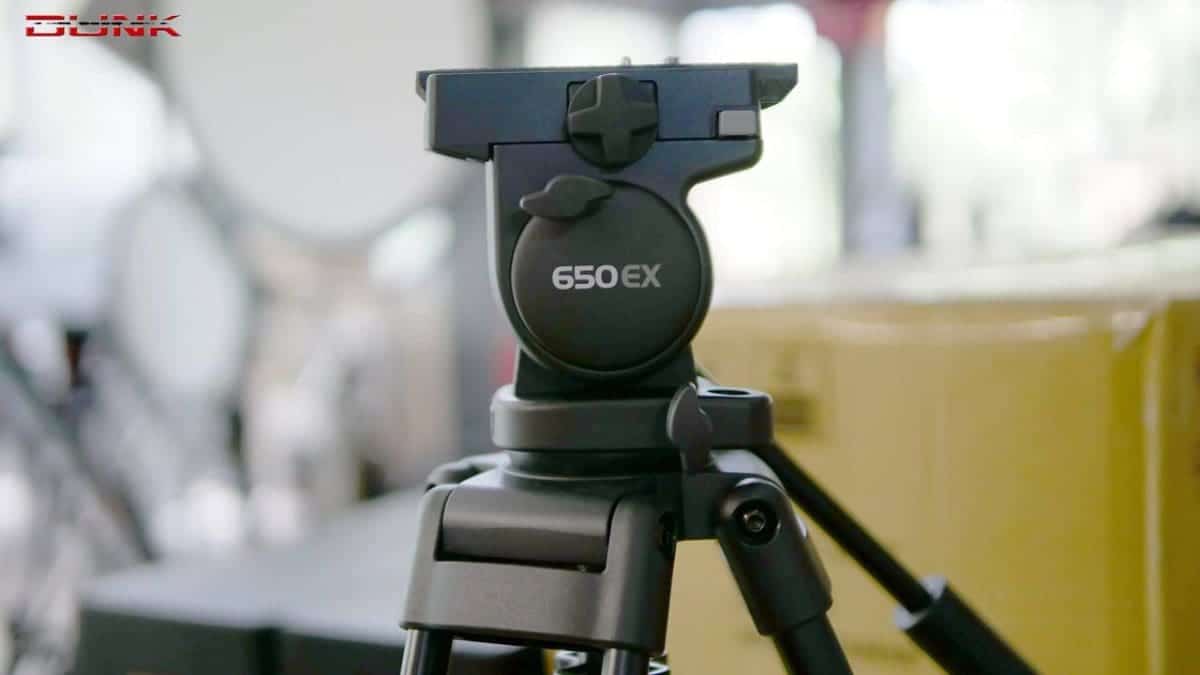
This is an entry level tripod and can only handle a light payload. It’s not the tallest but it has a fluid head which means any panning you do will be smooth. It is well priced, easy to use and will certainly be able to handle the Sony a6400.
Cost: £216
Headphones:
You’ll need a decent pair of headphones both for monitoring your audio during recording and also to use while editing. We recommend these:
Beyerdynamic DT 770 PRO 80 OHM (Studio)
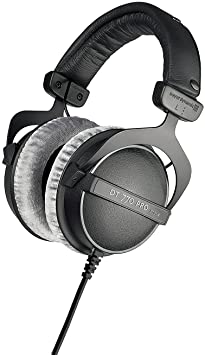
These are studio headphones so you will be able to hear all the detail in your sound. This includes sounds you might not pick up on when using headphones of poorer quality. However, these are quite expensive, and any pair of good quality headphones would work.
Cost: £90
Lenses:
When it comes to lenses there are thousands of options out there. They are all used for different situations so it is impossible to give a definitive answer as to which one you should pick.
Most cameras come with a kit lens and the Sony a6400 is no different. To keep the price under £1000, you can go with the 16-50mm kit lens which would give a field of view equivalent to a 24-75mm lens on the a6400’s crop sensor, which is a great focal range. However, if you wanted a little more out of your kit lens, you could get the 18-135mm. This would give the equivalent of a 27-202mm lens, this would give you a much more telephoto (zoomed in) option but would increase the price of the camera to £1199.
Either lens will compensate for the lack of IBIS in the Sony a6400 as they are OSS lenses (Optical Steady Shot, Sony’s brand of lens stabilisation) and will be a great starting point for your lens collection.
If you did need another lens, here is some advice to think about when choosing the right lenses for your camera:
What are you filming?
If you need to shoot something that is far away, you will want a long (telephoto) lens, 85mm+. If you are shooting interiors of buildings or want to see more of the space you are filming in you should use a wider lens, 24mm or less.
Gimbals:
It is inevitable that when shooting handheld even with steady hands, IBIS or OSS, you will see some camera shake. This is especially if you are walking with the camera or doing any sort of movements without a tripod.
A gimbal can be used to reduce or even completely take away all of that shake, even when running with a camera. They are a bit of a luxury but in the right situation they can make your shots look incredible.
Motorised gimbals are relatively new compared to the Steadicam systems used in big budget film or sport shooting. But they are cheaper, lighter and far more compact. They also require very little training to use. If you know you are going to be doing a lot of handheld filming, walking, running and want your shots to be smooth, we’d recommend using a DJI RS2.
It is perfect for a smaller camera like the Sony a6400. It’s easy to set up, but make sure you get everything balanced properly otherwise the system won’t work.
If you don’t want to buy a DJI RS2, but you think it could come in handy every once in a while, consider renting one for a small charge.
Cost: £699
Drone:
If you are wanting to do ariel videography, then you might want to consider a drone. But you do need to be aware of the safety regulations, for example, you can’t film within 50m of any person even if they are within a building, and you must have a 30m exclusion zone when you take off. Drone operators must be licensed and have all permissions and permits in place prior to filming.
We’d recommend you use a drone operator for this one as getting drone and licenses can be expensive so if you aren’t using it all the time, it just isn’t worth it.
SD Card Reader:
If your computer doesn’t have an SD card slot, you will need an SD card reader to be able to copy the footage from your camera and audio. Here is a good option:
UGREEN SD Card Reader USB 3.0 CF Memory Card Adapter Hub 5Gbps
Cost: £12.99
Conclusion:
With a budget of £2500 you would not be able to get everything in this tool kit, but you could certainly get started with a good set of equipment and start producing your own video content to a high standard.
Just remember that the secret of making a good video is in the concept. There is so much content out there right now that in order to be noticed you need to think creatively about your visuals. Anyone can make a video, but the difficult bit is making it engaging and enjoyable to watch.
If you’d like to talk to someone about how to get your visuals right, you can book in for Skylark Media’s free video consultation session.
Nyles Hollister
Video Content Producer, Skylark Media